WEBADI - Steps to create Custom Integrator:
For this we need below
Responsibilities:
1) Desktop Integration Manager
2) Desktop Integrator
Follow below steps to create Custom
Integrator in Oracle Application:
Step 1) Login to Oracle Application and
use Desktop Integration Manager responsibility:
Click on the Create Integrator to create
a New Custom Integrator
Enter below details:
- Integrator Name
- Internal Name
- Application
- Tick the checkbox "Display in
Create Document Page". - This is mandaroty
After
this click on Next Button.
Step
2) Define
the Interfaces:
Enter below details:
- Interface Name - Name appended with _IFACE for convenience.
- Interface Type - API - Procedure then enter Package Name and Procedure or Function.
- Package Name
- Procedure/Function Name
Click on Apply button.
Select radio button for display the
Interface attributes:
Click on Next Button.
Step
3) Contents
Tab:
We don’t need to define anything here.
Just click on Next Button.
Step
4)
Uploader Tab:
This defines the way data will be
loaded. Select "from Template" here to be able to load data using an
excel file.
Click on Next Button.
Step
5)
Importer Tab:
The importer is a program which will be
used to submit a concurrent program into the oracle application.
Click on Submit to create Custom Integrator.
Step
6) Define
Layout:
Switch the responsibility to Desktop
Integrator and select Define Layout.
Click on Go.
After we need to Create Layout:
Enter Layout Name: I have used Integrator name + _LAYOUT for convenience.
After we need to Create Layout:
Enter Layout Name: I have used Integrator name + _LAYOUT for convenience.
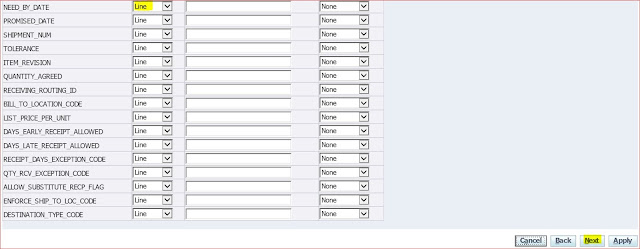
Click on Next button: Display the Required fields:
By default Placement is Context, but we need to change from Context to Line.
Click on Next button.
Its shows the Required fields details and also we will change Data entry rows (Default: 10).
Click on Apply.
Layout saved successfully.
Step 7) Create Document:
Once Layout saved then we will create Document file for load data using Template file.
Using Desktop Integrator responsibility we create Document.
Click on Create Document:
Open below OAF page, select created Integrator name and click on Next button:
Firstly, Save the file and then Open
it.


No comments:
Post a Comment